As we all know that Ubuntu has a six month release cycle for new version. All the PPAs and Packages of your choice also needs to be re-added, to avoid doing those stuffs and save your time, here we bringing a fantastic tool called ‘Aptik‘.
Aptik (Automated Package Backup and Restore) is a GUI application that lets you backup your favourite PPAs and Packages. It is very difficult to remember to which packages are installed and from where it has been installed them. We can take backup and restore of all the PPAs before re-installation or up-gradation of OS.
Aptik is a open source package that simplify backup and restore of PPAs, Applications and Packages after a fresh installation or upgradation of Debian based Ubuntu, Linux Mint and other Ubuntu derivatives.
Features of Aptik
* Custom PPAs and the Apps
* Backup Themes and icons
* Backup applications installed via APT cache
* Apps installed from Ubuntu Software Centre
* Aptik command-line options
How to Backup PPA’s and Packages on Old Systems
By default Aptik tool is not available under Ubuntu Software Centre, you need to use PPA to install it. Add the following PPA to your system and update the local repository and install package as shown.
Installation of Aptik
sudo apt-add-repository -y ppa:teejee2008/ppa
sudo apt-get update
sudo apt-get install aptik
Start ‘Aptik‘ from the applications menu.
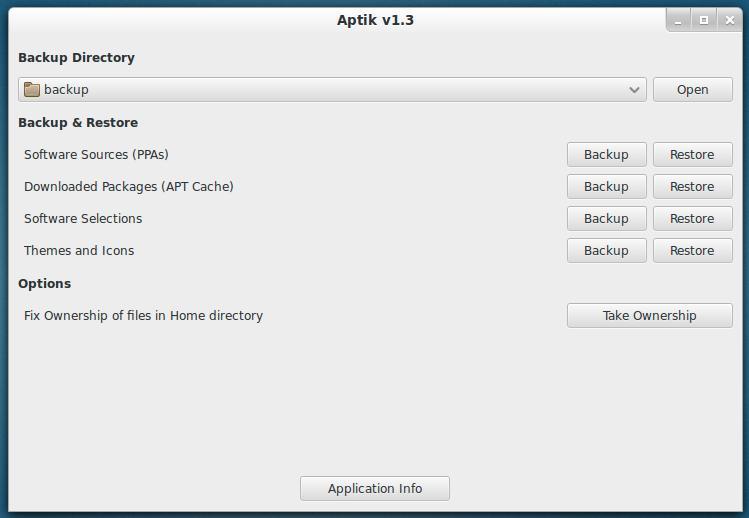
Create Backup Directory
Create or Select a backup directory to store your all sections to re-use on your new install.
/br>
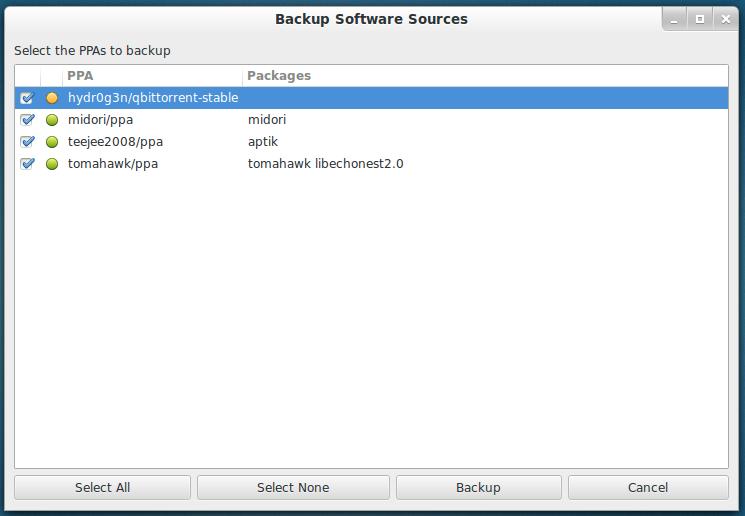
Backup Software Sources
Click the ‘Backup‘ button for Software Sources. A list of installed third-party PPAs will be displayed along with their Packages names that are installed from the PPA.
Note: PPAs with a green icon indicates as active and have some packages installed. Whereas yellow icon indicates as active but no packages installed.
Select your favourite PPAs and click on the ‘Backup‘ button to create backup. All PPAs will be stored in a file called ‘ppa.list‘ in the selected backup directory.
Backup Downloaded Packages (APT Cache)
Click the ‘Backup‘ button to copy all the downloaded packages to backup folder.
Note: All the downloaded packages stored under your ‘/var/cache/apt/archives‘ folder will be copied to the backup folder.
This step is only useful if you are re-installing the same version of Linux distribution. This step can be skipped for upgradation of system, since all the packages for the new release will be latest than the packages in the system cache.
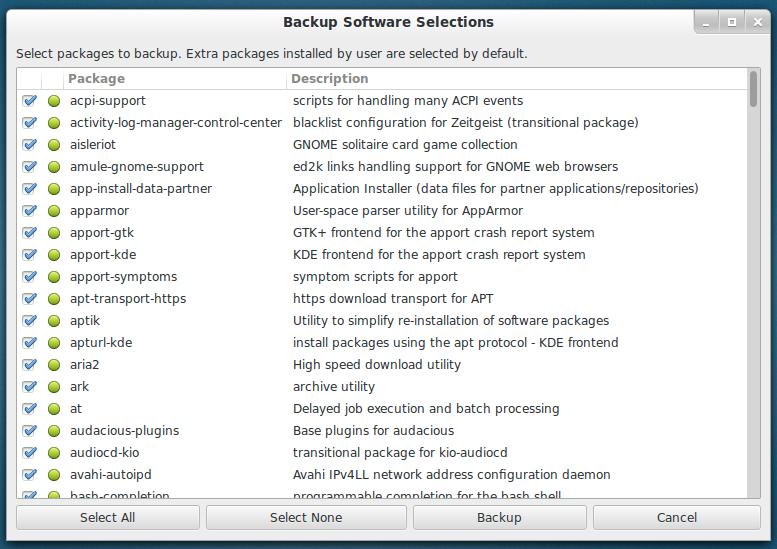
Backup Software Selections
Clicking the ‘Backup‘ button will show a list of all installed top-level packages.
Note: By default all the packages installed by Linux distribution are un-selected, because those packages are the part of Linux distribution. If required those packages can be selected for backup.
By default all extra packages installed by the user marked as selected, because those packages are installed via Software Centre or by running apt-get install command. If required those can be un-selected.
Select your favourite packages to backup and click the ‘Backup‘ button. A file named ‘packages.list‘ will be created under the backup directory.
Backup Backup Themes and Icons
Click the ‘Backup‘ button to list all the installed themes and icons from the ‘/usr/share/themes‘ and ‘/usr/share/icons‘ directories. Next, select your themes and click on the ‘Backup‘ button to backup.
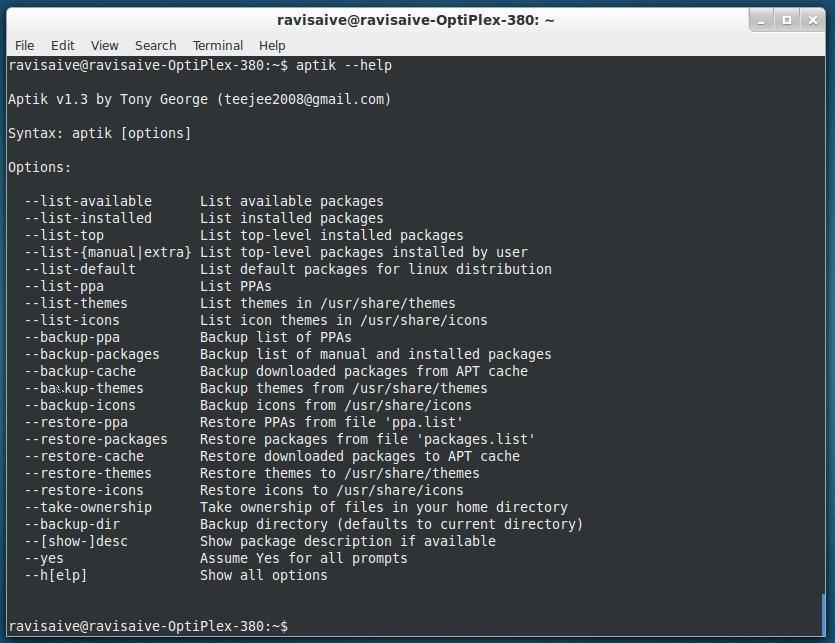
Aptik Command-line Otions
Run ‘aptik –help’ on the terminal to see the full list of available options.
To restore those backups, you will need to install Aptik from its own PPA on the newly installed system. After this, hit the ‘Restore’ button to restore all your PPAs Packages, Themes and Icons to your freshly installed system.
Conclusion
You may be wondering why such cool stuff is not by default available on Ubuntu? Ubuntu does it via ‘Ubuntu One‘ and that too paid apps. What do you think about this tool? Share you views through our comment section.